Logging In to your Training Account
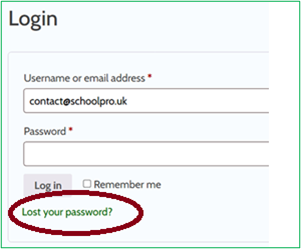
 Go to www.stagingschoolpro.mightybox.site/my-account and enter your username (usually your email address) and password. These credentials are provided in your ‘Welcome’ email from SchoolPro, from the email address contact@stagingschoolpro.mightybox.site.
Once you have done this, you will see all the courses that you are enrolled in. For accessing administrator controls, see Accessing Administrator Features below.
To get to this page again, you can click “Training Sign-In” on the green ribbon menu, always at the top of any page on our website.
Resetting Passwords
Option 1- Self Reset
 1 Send your staff member this link https://stagingschoolpro.mightybox.site/my-account/ and direct them to the reset button.
2 Staff can click on the “Lost your password?” link below the log-in box and a reset link is sent to their emails.
Option 2- Sending Staff a Reset Link
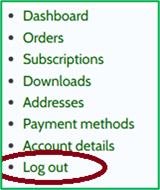 This is largely the same process as above but firstly you will need to log out of your account to get to the “lost your password” link.
1 Follow the same link https://stagingschoolpro.mightybox.site/my-account/ or click on “My Account/Sign in” on the green header bar at the top of the page if you already have the training platform open.
2 Scroll to almost the very bottom of the page and you will see a bullet-pointed list of green links. Select “log out”.
3 You will be able to follow the steps above, entering the email address of the staff member who needs a reset link.
4 Follow the same link in step 1 to log back into your own account.
Accessing Administrator Features
Enrolling New Users
All staff and governors need to be in the Cyber Security training group and the Data Protection training group that relates to their job role (NB: the only exception to this is if your school gets this training from another provider). Once on the Training Administration page (see above), you will see your schools’ organisation.
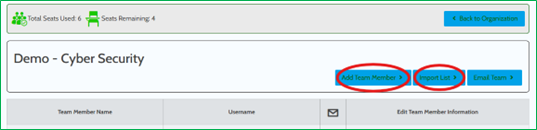
Step 1: There are two methods for adding staff. For both options, first click “Team Members” next to the course that you want to add staff to:
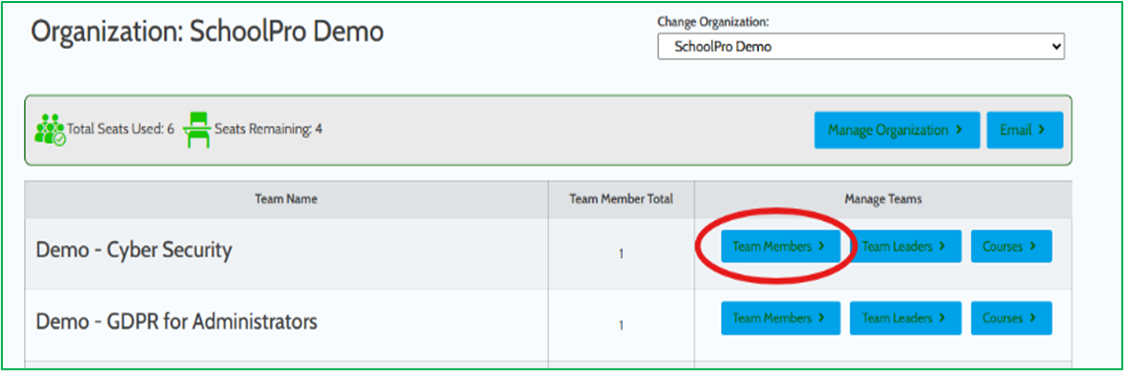
Step 2: Click ‘Add Team Member’ to follow Method 1 or ‘Import List’ to follow Method 2
Welcome Emails
Setting Up New Training Administrators
Setting Up New User Groups
Step 1: Navigate Training Administration page (see Accessing Administrator Features above) and you will see your schools’ organization page.
Step 2: This is the organisation page that is set up for you in advance, but you can customise it by setting up your own teams.
‘Manage Organisation’ allows you to allocate a specific course to a team and then specific staff to that team and course.
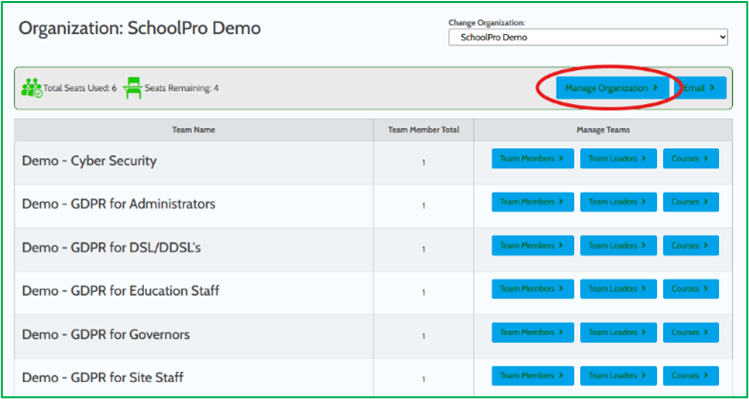
Step 3: Click ‘Manage Organization’ (highlighted above) and this pop-up will appear. If ‘Manage Organization’ button is not visible, please contact us and we will rectify this.
Click on ‘Add Team’ and you can create a new team, name it, allocate a staff member as leader and allocate a course.
In this example, we have named the team based on the course we are allocating and made that course the active course. The leader will be you!

Step 4: You can now add staff (labelled as ‘Team Members’ in the system) to each team following the steps in the Enrolling New Users section of this guide.
Progress Reporting
 All staff members will get an email with their course completion certificate when they have successfully completed but you can also access an overview of course completion for your whole staff list.
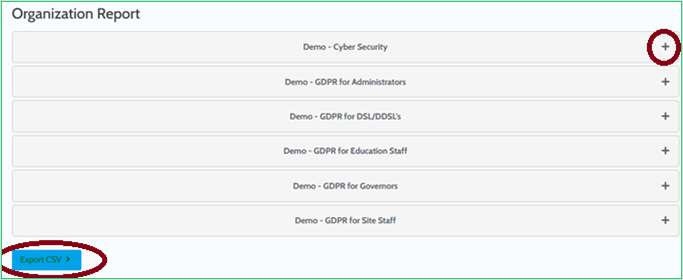
Navigate to the Training Admin view, following the steps in Accessing Administrator Features, earlier in this guide. At the bottom of the page under ‘Organization Report’ is the reporting tool which allows you to view team and individual progress, as well as export the data as a CSV file (Excel Spreadsheet). The CSV report is what we recommend that you download and retain for your records before removing users or resetting course progress when training refresh is due (see sections below for how-to on both of those). If staff members have completed the course, their completion date will show on the spreadsheet.
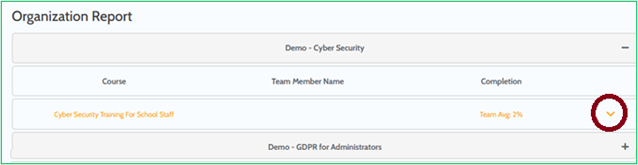 Clicking the + symbol next to the Group Name allows you to see Team Progress.
Clicking the v symbol next to the course name will allow you to see individual progress.
Printing Completion Certificates
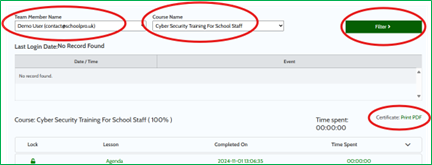 Certificates can be printed by visiting the ‘Team Members’ are, found below the list of user’s names. Select the user’s name and, if required, course from the two drop down menus, then click the ‘Filter’ button and you will see course progress and times detailed below.
If a certificate is available, to the right you will see ‘Certificate: Print PDF’. Select this to download the certificate.
Certificates can be printed by visiting the ‘Team Members’ are, found below the list of user’s names. Select the user’s name and, if required, course from the two drop down menus, then click the ‘Filter’ button and you will see course progress and times detailed below.
If a certificate is available, to the right you will see ‘Certificate: Print PDF’. Select this to download the certificate.
Moving or Deleting Users
If you want to move a member of staff from one classroom to another, add them to the new classroom using the ‘Team Member already exists?’ option, before ‘Removing’ them from their old classroom. You do this by selecting ‘Edit’ next to the user’s name in ‘Team Members’ and selecting ‘Remove‘. Please do not click ‘Remove’ if they are not part of another group yet, as this will mean you’ll get an error message when you try and add them elsewhere.

You can delete staff completely from the system when they leave their role, by selecting ‘Edit’ next to the user’s name in ‘Team Members’ and selecting ‘Delete’.
We recommend downloading a CSV report for your records or keeping a copy of their course certificate on file.
Resetting Training Courses for Users
When staff’s training certification is nearing expiration and you need them to retake the course, they can follow the steps below to reset your training access.
Please be advised: do not ask staff to reset their course progress until you have downloaded the CSV file Organisation Report, using the steps above in Progress Reporting. Once selected, all associated data – including course completions, dates and results – will be permanently removed. This action cannot be undone.
Once you have downloaded the progress report, send the instructions below to staff. You can use the emailing function on the platform (explained in the relevant section above)
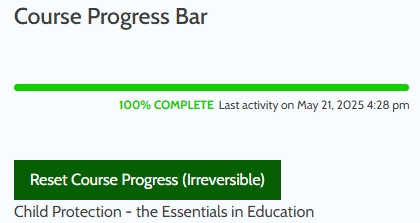
- Select the course you wish to reset by clicking on its title.
- Once the course opens, you’ll see the Course Progress Bar on the right-hand side, with the ‘reset’ option located just below.
- Click the ‘Reset Course Progress’
- The course will then reset, and you’ll be taken to the beginning, ready to start again.
Emailing the Team
The easiest way to send email reminders is via your internal systems, sending out this short Training User Guide that explains all functions available to them.
However, if you prefer, you can contact a team via email by selecting ‘Email Team’ from within each team area.
A pop-up window will open which allows you to configure a Team Broadcast Email which can be personalised using merge codes (see below).
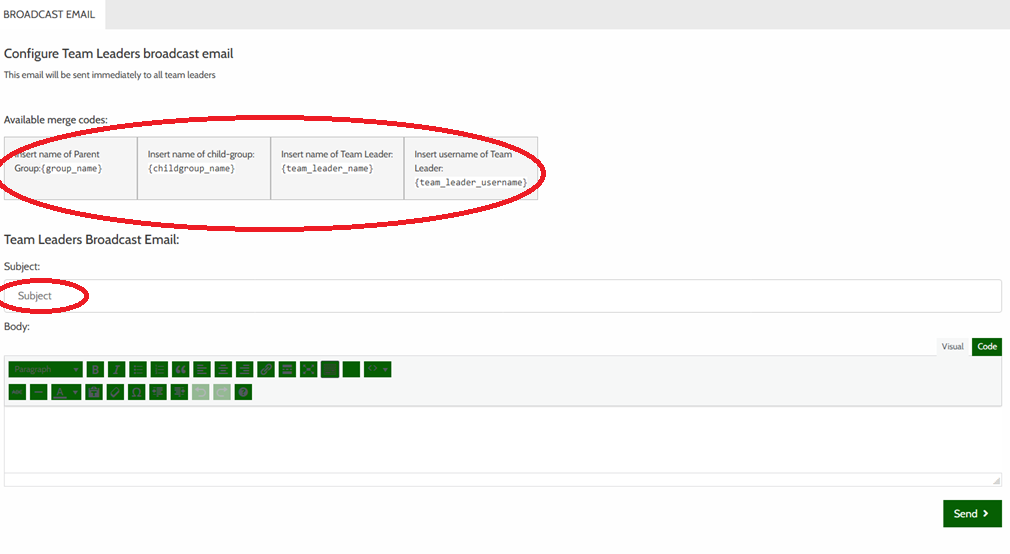 Once the email is set up, press ‘Send’ and the whole team will receive the personalized email.